This is an amazing party magic trick you can perform at your next party or casual gathering. It looks impossible, but it’s actually very simple to do. It looks like an advanced trick, but beginners can perform this with just a little bit of practice.
What you will need
2 identical glass cups
Some liquid to put into one of the glasses. It can really be any drink such as wine, juice, or water.
A small towel just large enough to be able to cover the glass. A good measurement is to measure it is around 1.5 times the size of the cup.
A table.
You need a table for this trick because it involves hiding the other glass in between your legs.
Here is what it looks like, and a tutorial on how to do it.
You obviously do not want to have people standing beside or behind you for this trick. For it to work best, it’s ideal if they are sitting across the table from you.
Benefits of Learning and Doing Magic Tricks
For starters, it is always good to learn! Learning keeps us young, it keeps our brains healthy, and it renews our enjoyment for life.
Teaches Commitment
Learning a new trick is great for learning how to stick with something, and do a skill until you get it down perfectly. Magic tricks are great for learning how to keep yourself in check and commit.
Helps Socialization
Doing magic tricks is a great social thing. Whenever you are unsure of how to fill empty moments at social events, you can always offer to show all present parties what you have mastered.
Boosts Motor Skills
Doing magic tricks leads to a boost in motor skills. Many of us are lagging in the coordination department, but doing magic tricks regularly sharpens our abilities.
Sharpens creativity
Being creative is part of what makes life worth living. Explore through magic!
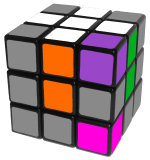
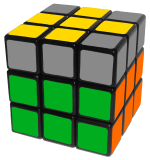
Solving a Rubik’s cube is no simple task. Solving a Rubik’s cube takes a good deal of patience and effort for most people. Have you ever tried to do it? According to FunTrivia.com, it takes an average of 48 to 100 tries to solve a Rubik’s cube. If done correctly, it can be solved in 17 turns. Knowing how to solve a rubik’s cube and do a few magic tricks can be a fun and impressive skill to show at a party. Some people have combined the two, for jaw-dropping entertainment.
History of the Rubik’s Cube
To completely understand how to solve a Rubik’s cube, you must know about its purpose and construction. In this section, I will provide you with a brief history of the Rubik’s cube. Believe it or not, it was never intended to be a toy. The Rubik’s cube was invented in 1974 by a Hungarian architect, Erno Rubik. What was its intended function? It was meant to serve as a three-dimensional model to explain geometric principles.
After designing this magic cube, he realized he could not solve it. As he moved the colored squares, he said: “It was a code I myself had invented! Yet, I could not read it.” Having nine colored squares on each side, the cube can be arranged in 43 quintillion ways (forty-three followed by eighteen zeros). It took him one month of rearranging the corners of each side to solve the puzzle. Since he was living in Hungary behind the Iron Curtain at that time, it took a few years for the puzzle to reach the market. In 1979, it was shown at the Nuremberg Toy Fair and spotted as a hit. In 1980 and 1981, it won Toy of the Year in the UK. By January 2009, it has sold more than 350 million copies, making it the greatest-selling toy of all time.
How to Solve a Rubik’s Cube
Have you experienced the frustration of holding a Rubik’s cube in your hands and being unable to solve it? Don’t worry too much about it. Whether you want to impress your friends with a fun party trick or close the chapter on that childhood curiosity, this guide will walk you through the simplest way to solve the puzzle.
An important thing to note when it comes to how to solve a Rubik’s cube is that it is not always easy. Sometimes, you may need to spend several hours attempting to solve it. However, if you would rather solve the cube in your hand than be able to solve any that are given to you, there are many informative articles and videos on the internet. The satisfaction of solving it is one of the best feelings. Are you interested?
Here is the first thing you need to know. There is an algorithm associated with how many turns are required to solve the cube. These turns can be represented by letters. The algorithms are combinations of moves that rotate pieces to get them where you want them. The puzzle has six sides (or faces) all of which can be turned individually – whether it be up or down, left or right, or front and back.
The common notation for these is U, D, L, R, F, and B. These faces can be turned in three different directions: U refers to turning the upper face clockwise, U’ is a counter-clockwise turn of the upper face, and U2 refers to half of a turning the upper face either direction. The apostrophe denotes a counterclockwise rotation for any of the notated movements. An advanced notion includes turns of the middle layers, double turns, and rotations. However, these won’t be needed in this guide. Now we will look at step one, the cross.
Step One: The Cross
Alright, here is the first step for how to solve a Rubik’s cube. This step can be confusing to understand at first. To gain a clear picture, you may need to read through and practice it several times. As you may have noticed from playing with the cube, the centerpieces cannot be moved, only rotated. While this may seem frustrating, you can use it to your advantage. Build the cross around the white sticker center. Many online guides start with this as the base, so even if you get confused during the process, you can look up demonstrations with a similar model online.
The first step you need to accomplish is to get the white cross on top of the cube. Don’t worry about matching the centerpieces just yet. For now, focus on getting the white edges to the top layer. Next, flip the edges of the squares so that the white stickers are facing up and form a plus. Hold the cube so that the edges that need to be flipped are facing you. Then, use the algorithm: F, R, D, R, F2. This algorithm flips the edges so that the white parts face upwards. Do this for all of the edges until you have a white cross on top.
Next, you will need to orient your pieces. Look at the edges of the Rubik’s cube. Are none of the pieces matching? Perhaps two pieces are matching or maybe even all of them are. If your piece has all four edges matching the centers, you have solved the cross. If none of the edges are matching, perform a U move and then take another look at the cube. You want to have at least two edges matching. If none of the edges are matching, do another U move. Repeat this algorithm until you have either two or four edges that match the center.
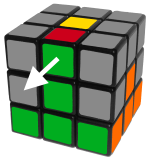
Step 2: The White Corners
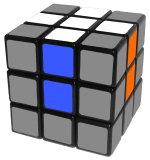
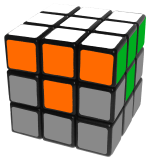
Now that you have completed the edges of the white face, all that you have left are the corners. This step is much simpler than the first, as it only requires one algorithm to complete. Take a look at the bottom layer of the puzzle. You want to locate the white, orange, and green corner. Statistically speaking, there is a fifty percent chance you will find this on the bottom of the cube. Follow these steps depending on where you locate the white, orange, and green corner.
Here is What You Should Do if You Find it on the Bottom Layer: If the green, white, and orange corner are on the bottom layer of the puzzle, use the required D move until the cube looks as pictured below. The required algorithm is as follows: R, D, R, D.
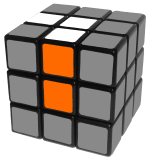
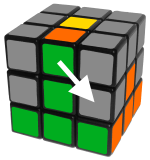
Here is What You Should Do if You Find it on the Top:
If the green, white, and orange corners are on the top of the Rubik’s cube, turn the cube to face you until the colors look like this picture below. Then, perform the R, D, R, D algorithm as many times as needed. Repeat this process until you completely solve the top layer. Start with the corners on the bottom, as this might save you a couple of unnecessary turns.
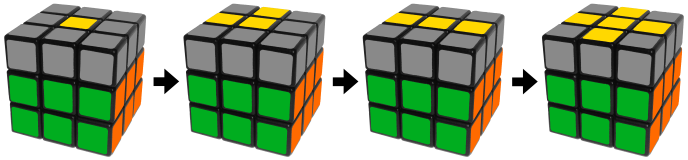
Middle Layer Edges:
Now, you are on to step three on how to solve a Rubik’s cube. Now that you are finished with all of the white pieces, you are ready to move on to flip your cube so it is all white on the bottom. Look for a piece on the top of the cube that is not yellow. Use a U move so that the color on the edge’s front face matches that of the center. It could go either left or right. Repeat this process for all four of the middle edges.
Left
Right
Step 4 Yellow Cross:
You are now two-thirds of the way through the puzzle. Every piece left to be solved has yellow on it somewhere. Now, we are going to solve the edges of the top layer in two steps. The first of the two steps involves orienting all of the yellow pieces so that they are all facing up. The second step involves moving these pieces around and thus solving the puzzle. Are you ready?
Ignore the corners at first. Look at the edges only. Are they oriented correctly? Here are the possible edge positions that you can have:
Are your edges currently solved in a cross pattern the way that we began this process? If so, you can go on and skip this step. If not, listen carefully. Besides the cross shape, it is possible to have a dot, L-shape, or a line as pictured above. To speed up the process, perform the following algorithm: F, U, R, U’ R’, F’.
Now, you should have an L shape, where the two yellow pieces that are showing are adjacent to one another. Complete the necessary number of U and U’ shapes to achieve this picture. Then, perform the following algorithm: F, R, U, R’, U’, F’. The four edges should now be oriented correctly.
Step 5: Sune and Antisune
Don’t be off-put by the names. Sune and antisune are beloved by many puzzlers due to their simplicity. After you have oriented the edges, there are seven different corner positions available to you. Sune and antisune are two of these which we will discuss in a minute. This is what your Rubik’s cube should look like by step five.
How do you get to the spot where you only need to orient one more corner? Follow this algorithm: R, U, R’, U, R, U2, R’. When you get to this desired spot, there are two variations that can occur. They will look something like this:
This is sune and antisune:
The yellow front-facing corner can be in two positions. It can face either the front or the right. In the first image above, the yellow is facing the front. This means that you have a sune position. To solve sune, do the aforementioned algorithm one more time to solve the top layer The antisune position occurs when the right-facing corner appears as it does in the second picture illustrated above.
Step 6: Finish the Rubik’s Cube
We are almost there! Hang on. Step six is the last part to solve the cube. While there are twenty-one cases for the top layer, we only need a few algorithms to figure them out and get it all sorted. First, we want to locate the headlights. The term ‘headlights’ refers to two corners that have the same color on one side. There are only two cases without headlights. For the case without headlights, perform the following algorithm from any angle: R’, F, R’, B2, R, F’, R’, B2, R2. At this point, you should have either finished the Rubik’s cube or a pair of headlights on every side of the puzzle.
After you performed the above algorithm in step six, there are five possible positions that your cube can be in now. Perform the necessary amount of U moves to ensure that each corner is in its right place. Do you have a completely solved bar? If so, perform the following algorithm and make sure that the bar is at the back: R, U’, R, U, R, U, R, U’, R’, U’, R2. If your cube is still unsolved, perform the above algorithm one more time, keeping the completed bar at the back of the cube. If you do not have a solved bar, you can perform this algorithm from any angle that you would like to. This will give you a solved bar and then you can do the algorithm one more time in order to complete the puzzle. Congratulations, you have completed the cube!
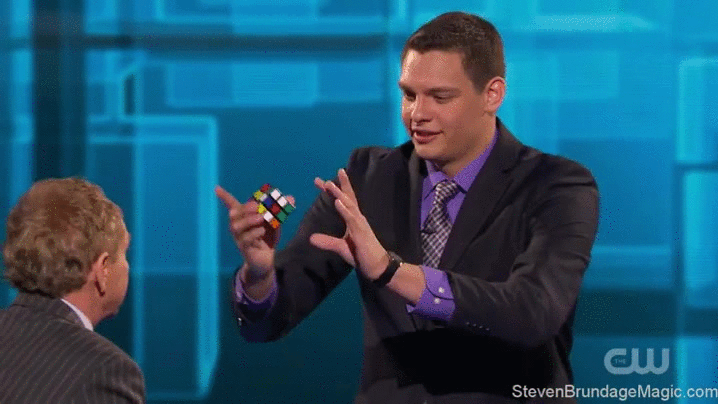
Magicians and a Sleight of Hand
A few days ago, we were watching Penn and Teller’s hit TV show, Fool Us. On this show, magicians are given the challenge to trick two of the greatest minds in magic, Penn and Teller. A magician named Steven Brundage performed a magic trick using a Rubik’s Cube that blew away the audience and fooled two of the greatest minds in magic. You might be wondering ‘How is a Rubik’s Cube used in magic?’ The classic Rubik’s Cube magic trick is to solve it instantly… faster than humanly possible. The magician literally throws the toy (randomly mixed) into the air and by the time he catches it, it’s solved.
This is what it looks like:
Believe it or not, this is actually one of the simpler magic tricks to accomplish. The action involves the magician first taking a scrambled cube and showing it to the audience. Then, he attempts to solve it before throwing it up in the air. When he catches it, the Rubik’s cube is solved. So how is this trick done? There are actually a few ways to perform this magic trick.
How exactly did he do it? We’ve done our research and there are several common ways that a magician solves a Rubik’s cube instantly. We’ve broken them down in the sections below. Read through each of the possible methods and see if you can identify which one he used. We have to say that we are particularly impressed with Steven Brundage. Even after some heavy duty research, we’re still not exactly sure how he pulled it off. See if you can figure it out.
As you can see, it’s solved instantly.
Here’s the full performance:
The Classic Rubik’s Cube trick revealed
Here’s the tutorial on how the basic trick works.
How to Solve a Rubik’s Cube with Magic Instantly Explained:
Method 1:
The first one involves using a fake Rubik’s cube. When it is solved, one of the sides appears to be scrambled. This is not possible to do on a normal Rubik’s cube. By carrying out six simple moves on the cube, the cube appears to be completely scrambled. Using this cube, you can show the audience all sides. Then, hold the scrambled side facing the audience and undo the six moves you previously did, pretending to solve it. With a slight sleight of hand, the audience will believe they have seen all of the sides.
Method 2:
The next most common magic trick involves taking a mixed up Rubik’s cube, showing it to the audience, and then putting it inside of a paper bag. After the cube is taken out of the bag, it is solved. How can this be? Popular opinion is that this trick is a gimmick. In every performance with this trick, the paper bag is immediately thrown away without the audience being able to get a second look at it.
Method 3:
This is the most likely speculation for how Brundage could have pulled off the magic trick. In his live performance, he scrambles his own Rubik’s cube while speaking to the crowd, leaving the selected one untouched. Brundage then asks Teller to hold the cube in his hands. When he opens his hands, the cube matches the one that Brundage had scrambled. Brundage performed a set of moves on one cube and then repeats it on the scrambled cube while talking to the audience later on. While this sounds highly plausible, there is one thing wrong with this method. The theory would not work unless Brundage already knew which cube Teller would choose from the two that were scrambled. It is highly likely he had a plan for both cubes but we cannot know for sure.
Now that you know each of the magician’s methods used to solve a Rubik’s cube, let’s go back and watch Steven Brundage perform one more time. As you can see, it’s solved instantly. What an amazing sleight of hand! If you look at it over and over, you can see that he actually makes 4 moves. Did you catch it? Watch carefully. It’s extremely quick.
The Classic Rubik’s Cube trick is revealed:
Here’s the tutorial on how the basic trick works. As you can see, it’s a gimmick cube. That’s the classic way that the trick is done. However, Steven does not use a gimmick cube for his routine. He could perform that trick with any Rubik’s Cube according to his interviews. Steven states that there was no switching going on. That means: There weren’t extra trick cubes hiding behind the table that he was switching around. He states: “With all the being said… Yes, I am extremely good with Rubik’s Cubes.”
The classic Rubik’s Cube technique makes a lot of sense. He does say in his interview that if he were to use trick cubes, every one of his tricks would look identical as they did when he wasn’t. But even as he points out these subtle hints, it’s impossible to tell just how he performed this trick without a gimmick cube. Thanks to PerryThePly, a reader of Rebel Magic for sending in this update! He’s found something that gets us closer to understanding how this trick is done.
Thanks to PerryThePly, a reader of Rebel Magic for sending in this update!
He’s found something that gets us closer to understanding how this trick is done.
Do you want to learn about easy coin tricks that make you look like you have superhuman strength? Take advantage of this opportunity and add another magic act to your repertoire of tricks. This is a bit more difficult to learn than card tricks and is an excellent example of close-up magic. Those searching for some great magic tricks for kids will be happy to know that the coin vanishing trick is suitable for all ages, little ones included.
You’ve probably seen this coin master hack before. It’s one of the oldest tricks in the book. The magician takes a coin in his fist. Closing his fist, he squeezes hard. After 5-10 seconds, he opens his hands back up and the coin is gone.
What is Coin Magic?
Coin magic involves the manipulation of a coin in front of a single spectator or small audience. Since most coins are small, magic coin tricks fall into the category of close-up magic or table magic. Stage magicians generally do not perform this type of magic. Should they choose to, they will use a large screen projector so that the audience can get a good view of the trick.
As we mentioned earlier, coin magic is more difficult to learn than card magic tricks. It not only requires a great deal of practice but also some serious skill to hone. There are very many different types of coin tricks. Some examples include productions, vanishing, teleportations, penetrations, levitation, and mental magic. In this article, we will focus on one of the best vanishing coin tricks.
Simple effects could be as simple as borrowing a coin, making it vanish, concealing it, and then returning it. More complex acts may involve multiple coins and other objects or props (e.g. a handkerchief, a piece of paper, a glass cup, etc.). The key to most coin magic lies in how small and portable the object is. You will be surprised at what a basic sleight of hand can do. An audience is often amazed by the simplest mystery.
Coin Magic Performances
Some coin magic uses gimmicks (e.g. modified coins or trick coins). While this may sound a bit disappointing to those learning magic, you should know that these objects are not entirely responsible for creating the magical effect. If you would like to purchase one, several prominent manufacturers create gimmick coins. Tango Magic, Sasco, Johnson, and Sterling are a few of these brands.
Keep in mind that performers who rely entirely on special equipment are not as impressive to the audience. While it does take a lot of practice, coin acts are fairly easy magic tricks. Most spectators are more impressed by an effect that depends on sleight of hand and misdirection rather than a set that is entirely made of props. Nonetheless, a person who has learned simple magic tricks can use gimmicks without it being obvious to the audience. Most well-known magicians started by learning simple tricks with a coin and a deck of cards.
So How Does the Coin Vanish?
Most people brush it off as either a gimmick coin of some kind or some really advanced sleight of hand that they probably couldn’t do anyway. When you see how it’s actually done, you’ll see that just about anybody can do this trick. In addition to the video below, we will give you all the tips and tricks on how to perform the coin vanish act. You will be a coin master before you know it!
What You Will Need to Learn Coin Magic Tricks
Yes, the coin vanish is kind of a gimmick trick. You need to do some preparation beforehand in order to pull it off. There are a few ways to do the trick. You can choose to do the coin vanish trick by making it stick to your hand (as explained below) or by hiding the coin between your thumb and index finger. We will explain how to do the trick using both methods, but first, here’s what you’ll need for each method:
For method one, you’ll need:
Chapstick or a regular glue stick
A coin – preferably a quarter
For method two, you literally just need the coin. And that’s it!
How to Do Magic Tricks with a Coin
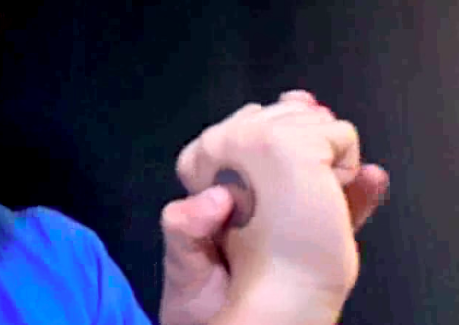
Here’s How Method One Works
First, you’ll need to apply the chapstick or glue stick to the back of your hand. Choose whichever hand you’re going to pretend to squeeze the coin in. You’ll need to apply quite a bit of it – enough to make a coin stick to it and not fall off. Here’s the big secret: The coin isn’t even in the fist when the magician squeezes on it. He moves it to the back of his fist (which is out of sight from the spectators) and then squeezes it there.
Watch the video below to see how you get it to the back without being caught by spectators.
Here’s How Method Two Works
Place the quarter in your hand, positioning it so it rests near your middle finger, close to your palm. This is an ideal place to put it because you can easily keep the quarter in place with your thumb in this position. Next, hold out both of your hands to the audience to show the quarter in one hand and the other hand empty. Make sure you are talking to the audience to distract them. Explain that the magic is in your hands, not the quarter.
Now, it is time to make the coin disappear. It will take a lot of practice to make it look smooth and effortless. Bring your empty hand under the hand holding the quarter. Move your empty hand in and act like you are dropping the quarter into it. While the audience thinks that the coin has transferred hands, you will actually keep the quarter in the original hand and hold it in place with your thumb.
As you act like you are changing hands with the quarter, make a loose fist with your empty hand as if you are about to catch the quarter. Move your hands apart from one another after you have ‘transferred’ the quarter. To keep the focus on your hand (which is actually empty), bring it up higher near your face and slip your original hand (holding the quarter) down by your side and put it away.
Show that the quarter has vanished. To show off the vanishing act, there are a number of flourishes that you can do. Tap your knuckles with a magic wand, squeeze your fist tightly, or blow into your hand and then reveal the coin is gone. This is one of the most fun coin tricks for beginners.
Does Anyone Know the Coin Trick Revolution?
A number of performers who learn the coin trick vanish also have an active interest in the coin trick revolution. Have you heard of this magic act before? Practicing this trick will put you well on your way to becoming a good magician. Here’s how to do it:
To start, stand at a slight angle facing the audience with the hand with the coin close to your pocket. You want to make sure that it is unnoticeable.
As you pick up the coin with your fingers covering it, bring the coin between your index finger and thumb. Then, let the coin casually slip into your pocket. Bring your hand up with your index finger and thumb in the same position. Pretend to clutch the make-believe coin in the palm of your hand. Then, open your hands to reveal that the coin has disappeared. You can find a video showing the act here.
When to Perform Coin Magic Tricks
Since the trick utilizes angles (ex. you can see the coin from behind or even side angles), it’s best when you have the full audience directly in front of you. Also, you will want to perform this carefully. It requires an audience with kind manners. You don’t want to do this for your friends and have them smack your hands right after you’re done. If performed right, it looks absolutely amazing. The glue/chapstick is kind of a turn-off for more advanced magicians, but the effect is spectacular.
Practice and Prepare to Wow the Crowd
That’s it – these are the coin magic tricks revealed! There is a great amount of fun to be had in performing tricks with coins or a money note. Due to their size and portability, both of them are a great choice for performing the vanishing object magic tricks. For anyone who wants to learn magic tricks, this is a great place to start. One of the best tips that we can give aspiring magicians is to practice their act a lot before they take it in front of an audience. There are plenty of great online information resources, blogs, informative videos, and books that can help you along your journey. Have patience, take your time, and you will get there.
Everyone has tried to guess someone’s age before. But if you’re a magician and you’re in a show, guessing someone’s age incorrectly will discredit your skills in front of your audience. If, however, you memorize this math-based trick, you will actually be able to tell anyone their age. All you need for this age guesser trick is a calculator.
To help people see your calculator, try to get one with big buttons and a big screen. That’s really for their benefit, not yours! You might even decide to show the calculator through a projector screen if you’re performing this in front of a large crowd.
How It Works: Methods to Guess Someone’s Age Correctly
There are many ways you can perform the ‘guess her age’ challenge. The secret is that you are not guessing at all. In this article, we will go over a few methods, including the famous math-based trick. To the participant, it appears that you are performing a magic trick. But all you need to do is memorize these instructions and practice. The math is proven to work every time. Make sure to give clear instructions so you can get their birth month and year (without them realizing, of course).
1. Guess Someone’s Age Using a Selected Number
The first way to perform the age guess magic trick is through deduction with a selected number. You can perform this trick with a friend or stranger. Ask the participant to choose a number between one and ten. Once they have a number in mind, have them announce it. Let’s say they chose the number 7. Pause to tell them that you’re sorry, and you didn’t realize the math might be too hard for them, so you’ll get them a calculator.
Multiply the number they have chosen by two (e.g. 7 x 2 = 14). You can choose to do this math by hand or have a friend use a calculator to do the rest of the trick. Tell them that they must push the equals button on the calculator for every instruction you give.
Second, walk them through selecting their number and multiplying it by two again on the calculator. This is a great opportunity to build some humor into the act. Continue this humor by asking them to get ready for some big math before telling them to add 5 to their current value (14 + 5 = 19).
Then, move into the big math. Ask them to multiply the current number by 50 (19 x 50 = 950). Ask the participant if they have already celebrated their birthday this year. Did their birthday pass already? If so, you will add 1,769 to the prior result (e.g. 950 + 1,769 = 2,719). If not, then add 1,768 to the prior result (e.g. 950 + 1,768 = 2,718).
This number changes yearly, so here is a chart to reference:
2019: +1768 or +1769
2020: +1769 or +1770
2021: +1770 or +1771
2022: +1771 or +1772
After they add this number in, tell them not to say it out loud, but to subtract their birth year. Then, say “That’s it!” They’ll be confused because they will have a three-digit number far too large to be their age. You can act confused as well, and take the calculator from them.
Have them subtract the year they were born from these numbers without you looking (e.g. 2,718 – 1989 = 729). Look at the final answer. The first digit in place will be the original chosen number from the participant. The last two numbers will be the person’s age. So, the participant here would be 29 years old.
Put on a show sharing this information with the audience, and you’ve successfully guessed both their age and the number they chose at the start of the trick without hurting any feelings. At the end of it, people will think you are a mind reader. All it took was some simple math!
2. Guess Someone’s Age Using a Calculator
The second way to perform the age guessing game is by using a calculator. While the participant may need a calculator to perform the first act, this method is quite different. Start by asking the participant to multiply the first digit of their age by five. Let’s say that they are twenty years old (e.g. 2 x 5 = 10). Now, tell them to add three (e.g. 10 + 3 = 13). Have them double the resulting number (e.g. 13 x 2 = 26).
Now, have them add the second digit of their age to the resulting number (e.g. 26 + 0 = 26). Tell them to subtract six. This will be their current age (e.g. 26 – 6 = 20).
3. Guess Someone’s Birth Month and Date with a Calculator
Did you know that you can also use a calculator to deduce someone’s date and month of birth? This is a fun way to take the let’s ‘guess your age’ magic trick up a notch.
Start by entering the number seven in the calculator. Then, have the participant multiply the number seven by their birth month. Let’s say their birth month is May (e.g. 7 x 5 = 35). Remember not to look at the calculator. You don’t want the person (or audience) to think that you are cheating.
Now, subtract one from that number (e.g. 35 – 1 = 34). Multiply the resulting number by thirteen (e.g. 34 x 13 = 442). Have them add the day of their birth (e.g. 442 + 28 = 470) and then add three (470 + 3 = 437). Multiply the new number by eleven (437 x 11 = 5,203). Subtract the month of their birth (5,203 – 5 = 5,198).
Now, subtract the day of their birth (5,198 – 28 = 5,170) and divide by ten (5,170 / 10 = 517). Add eleven (517 + 11 = 528). Divide by 100 (528b / 100 = 5.28). The first digit before the decimal is their birth month (5 = May). The two digits after the decimal point is their birth day (28 = birth day).
Have you Heard About the Artificial Intelligence Age Guesser?
Nowadays, the sophistication of technology is moving at a surprisingly rapid rate. You may have heard that a few years ago, Amazon and Microsoft both released an artificial intelligence picture age guesser. You choose to either upload a picture of yourself or take a selfie. The device scans your photo and through face detection, assesses your age. We wondered how accurate the age guesser is. So naturally, we had to try it out for ourselves.
After reading multiple reviews and experimenting with the software ourselves, we did not find it to be accurate. The software will make different estimates for your age based upon nuances like your facial expression and the angle from which the photo was taken. For magicians, we would stick with the math-based age guesser tricks to accurately gauge someone’s age. Don’t try to take a shortcut and use image software first.
Brush Up on Your Math Skills and Memorize these Formulas
We get that math is not everyone’s strong suit. That is why we are so excited to share these formulas. All you need to do is practice and use a standard calculator to perform this age guessing trick accurately. Make sure to memorize the formulas before you try it out on a stranger or perform in front of a small audience. With repetition and dedication, you are on your way to becoming a good magician.
Watch it in action!
Watch the same magic trick you learned above, and see how it works on you!
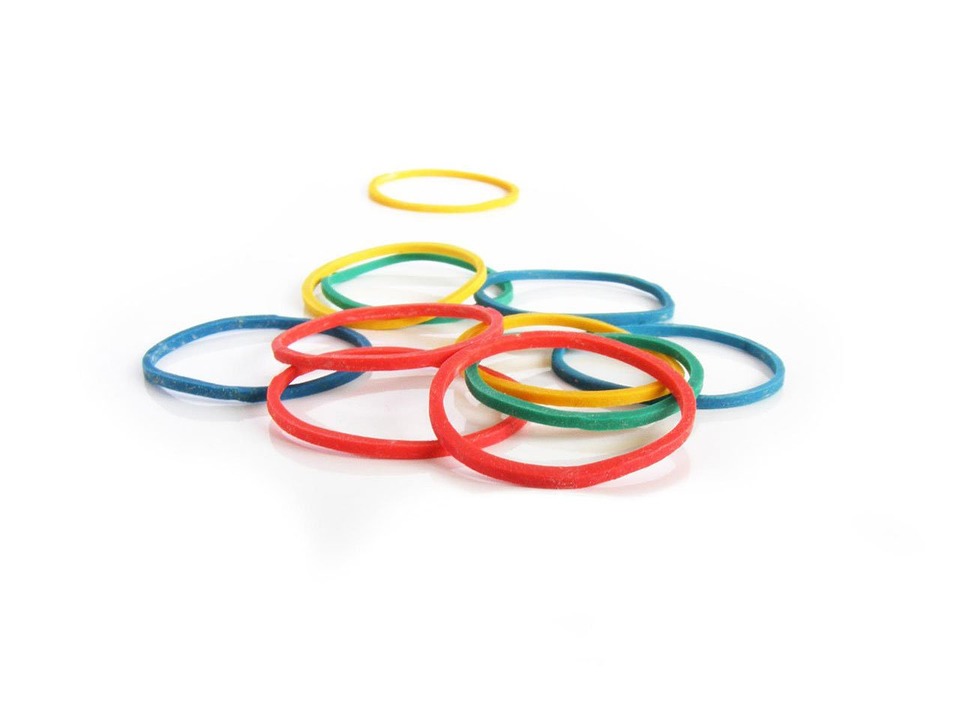
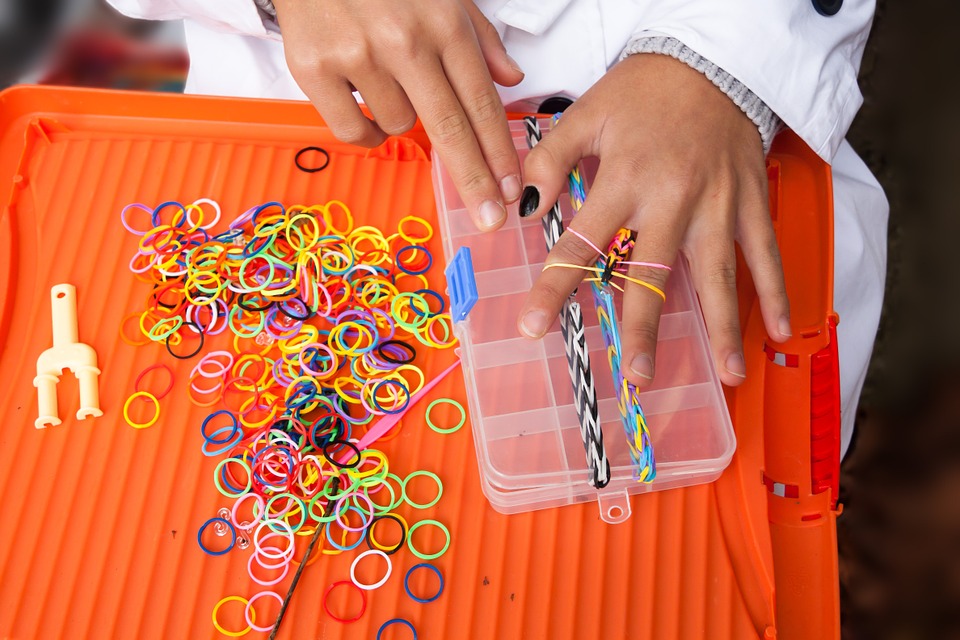
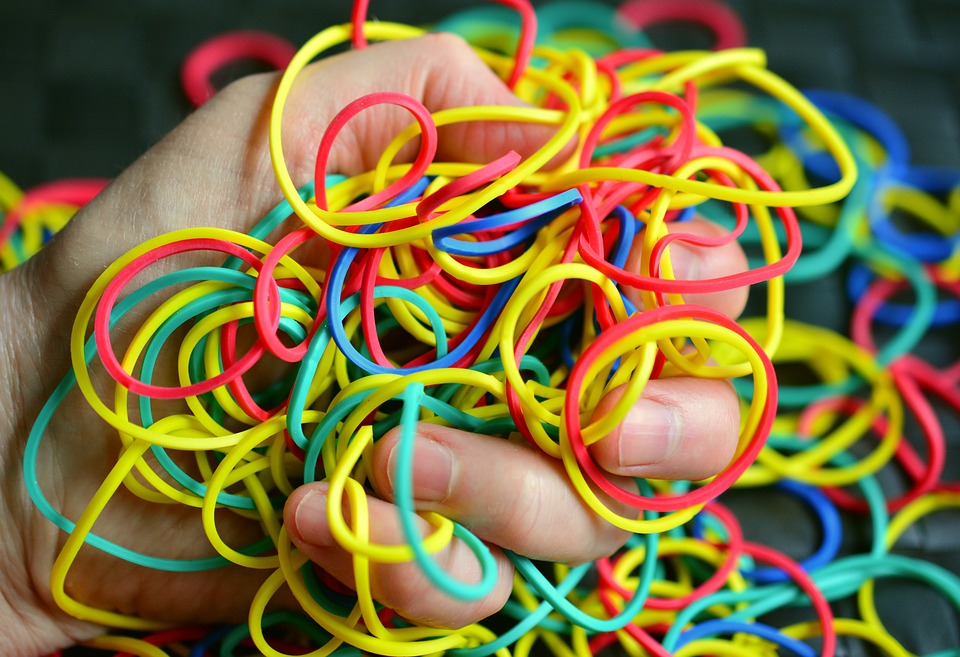
Need some simple rubber band tricks to add to your magic act? There is a lot to research and learn, so we have narrowed it down to five different choices for you.
Rubber bands are a fantastic, easy, elastic tool to use in your act. These bands are extremely thin and flexible, making them perfect for practice and impressing your audience. They are also a great type of trick for parties and small events where you don’t want to bring bigger and more complicated props.
These tricks are all relatively simple, but all have the potential to really wow your audience. We will also go over step-by-step instructions for perfecting them, so you will have no issues pulling them off when the time comes.
The Rubber Band Through the Thumb Trick
For this first trick, you will simply need one rubber band. It is recommended that you use a brightly colored one so that the effect is more obvious for your audience. Yellow, red, blue and green will be the easiest ones to see.
To get into the correct position, place the rubber band around your right thumb and then place the middle and ring fingers of your left hand through the other end of the rubber band. Now swing your middle finger around and grab the top part of the rubber band and pull down, then twist your left hand to make a cross on the band and place your thumb down and pull. This creates a slip knot under your thumb which will be easy to hide.
Practice these few steps slowly many times to get the hang of it, and after some time, it will be much easier to do the trick quickly and efficiently. It will take some effort to perfect this, but once you do, it will look like the rubber band has gone around your thumb twice. The end result looks great and will leave your audience in awe.
Once you have perfected the previous steps, you will be able to slowly pull the rubber band to make the knot slip – this will make it look like the rubber band has gone directly through your thumb. Here’s a video that gives you a fantastic visual.
This is one of the most famous and well-known tricks you can attempt. Your audience will really enjoy this trick.
To begin, you will need any rubber band. Then hold your hands in front of you and wrap one band around your pinky and ring finger, letting it rest at the base of your fingers. With your other hand, stretch the elastic band and insert the tips of your pinky, ring finger, middle finger, and pointer finger into the loop.
Keep them inside the loop against the palm of your hand in a position that allows the band to be held by all four fingers, but in two different ways. The pinky and ring finger will hold in near the tips and your middle finger and pointer finger hold the band by inserting it into the loop. Once you have done this, you should be able to easily open or straighten your fingers, which will automatically make the band jump onto your middle and pointer fingers.
Practice definitely makes perfect with this trick. Keep attempting it until you can do it easily.
The Advanced Jumping Rubber Band Trick
Image: CC0 Creative Commons, stux, via Pixabay
This is a variation of the last trick we looked at, but it is a little more intricate and can be confusing while you learn it. Once you have practiced it many times, you will be able to do it quickly, making it look really neat for your viewers.
This trick will require two different rubber bands of two different colors. Just like the first step of the last trick, you will hold your hands out in front of you with the backs facing your audience. Then you will insert the first band onto your pinky and ring finger until it reaches the base of the two of them.
With the second band, make a loop around the tip of your pinky finger and twist it back and forth to loop it around the tips of your fingers. Keep making loops like this until all of the four fingers are encased in the band. By the end of this step, you should have the second band looped around the tips of all four fingers and the first band in the same position at the base of your ring and pinky finger.
At this point, you should put your thumb in the loop and close your wrist in order to put the first rubber band on your middle and pointer finger. This allows you to switch the first band from the first position to the second, even when the second rubber band is encased around four of your fingers.
This one will take a lot of practice, but once you master it, the trick will become a crowd favorite.
The Rising Ring Rubber Band Tricks
Image: CC0 Creative Commons, congerdesign, via Pixabay
First, thread the ring you are using onto a broken rubber band. As you hold onto the band, allow a large length of the band to accumulate in the hand that the ring is sliding away from.
Once you have the ring and the rubber band in place, pull the band tight and rotate it at a slight incline. Make sure that the ring is resting on the lower part of the band, pull it taut and very slowly release the extra band that is in your left hand. The rubber band will come out slowly and carry the ring with it, creating the illusion that the ring is rising. The band is, in reality, the part that is moving.
This will take a lot of practice to master, but once you have it down, you will be able to do it in your sleep. One tip that will make it easier to pull off the illusion is standing a little further away than you normally would from your audience so that they do not see the rubber band slowly moving. This forces them to focus on the ring, making the trick more real to them.
Card Reveal with Rubber Band Trick
This trick while requires a deck of cards in addition to a medium rubber band. Put the rubber band around your wrist until it is needed later in the process. For this trick, it is better to use a nice thick band, as it is helpful for the illusion.
Fan out the deck of cards and ask a member of your audience to randomly choose a playing card from the deck. Once they have chosen one, ask them to place it on the deck of cards and then shuffle them.
At this point, you will remove the rubber band from your wrist and wrap it around the deck of cards. Then remove the bottom card and place it on top of the deck. Turn the cards over and place the top card back into the deck. After this, you will cut the cards with the rubber band still around them, twist one section completely, and place it back into the deck with a snap.
Then completely release the deck and allow the rubber band to spin the deck – this will allow the spectator’s card to be thrown back to them.
Vanishing Rubber Band Tricks
For this particular trick, you are going to want a variety of different rubber bands on your wrist.
You will take one of them and give it a twist. Then you will pinch between your hands so it looks like you have a rubber band between your fingers. Basically, it goes around the wrist, and it vanishes when you let go of it.
This trick is simple but will have a great effect on your audience. You are basically taking a rubber band off your wrist, letting it go, and letting those watching believe that it has disappeared. Want a visual of this trick? Here’s a great video example.
Getting Started
Now that you have all the tricks that you need to dazzle your audience, it’s time to start adding these tricks to your magic act. Sprinkling the different rubber band tricks throughout your show is a great way to break up the regular tricks you have already been performing, and it gives the audience something short and fun to observe between longer and more complicated tricks.
These are also great ones to try at parties or among a small group of friends, as they mostly don’t require any props besides a few rubber bands. People of all ages and even small children will love to watch you perform these simple tricks.
If you have attempted these tricks, which ones do you like the most? Which ones do you find that the audience enjoys the most?