Solving a Rubik’s cube is no simple task. Solving a Rubik’s cube takes a good deal of patience and effort for most people. Have you ever tried to do it? According to FunTrivia.com, it takes an average of 48 to 100 tries to solve a Rubik’s cube. If done correctly, it can be solved in 17 turns. Knowing how to solve a rubik’s cube and do a few magic tricks can be a fun and impressive skill to show at a party. Some people have combined the two, for jaw-dropping entertainment.
History of the Rubik’s Cube
To completely understand how to solve a Rubik’s cube, you must know about its purpose and construction. In this section, I will provide you with a brief history of the Rubik’s cube. Believe it or not, it was never intended to be a toy. The Rubik’s cube was invented in 1974 by a Hungarian architect, Erno Rubik. What was its intended function? It was meant to serve as a three-dimensional model to explain geometric principles.
After designing this magic cube, he realized he could not solve it. As he moved the colored squares, he said: “It was a code I myself had invented! Yet, I could not read it.” Having nine colored squares on each side, the cube can be arranged in 43 quintillion ways (forty-three followed by eighteen zeros). It took him one month of rearranging the corners of each side to solve the puzzle. Since he was living in Hungary behind the Iron Curtain at that time, it took a few years for the puzzle to reach the market. In 1979, it was shown at the Nuremberg Toy Fair and spotted as a hit. In 1980 and 1981, it won Toy of the Year in the UK. By January 2009, it has sold more than 350 million copies, making it the greatest-selling toy of all time.
How to Solve a Rubik’s Cube
Have you experienced the frustration of holding a Rubik’s cube in your hands and being unable to solve it? Don’t worry too much about it. Whether you want to impress your friends with a fun party trick or close the chapter on that childhood curiosity, this guide will walk you through the simplest way to solve the puzzle.
An important thing to note when it comes to how to solve a Rubik’s cube is that it is not always easy. Sometimes, you may need to spend several hours attempting to solve it. However, if you would rather solve the cube in your hand than be able to solve any that are given to you, there are many informative articles and videos on the internet. The satisfaction of solving it is one of the best feelings. Are you interested?
Here is the first thing you need to know. There is an algorithm associated with how many turns are required to solve the cube. These turns can be represented by letters. The algorithms are combinations of moves that rotate pieces to get them where you want them. The puzzle has six sides (or faces) all of which can be turned individually – whether it be up or down, left or right, or front and back.
The common notation for these is U, D, L, R, F, and B. These faces can be turned in three different directions: U refers to turning the upper face clockwise, U’ is a counter-clockwise turn of the upper face, and U2 refers to half of a turning the upper face either direction. The apostrophe denotes a counterclockwise rotation for any of the notated movements. An advanced notion includes turns of the middle layers, double turns, and rotations. However, these won’t be needed in this guide. Now we will look at step one, the cross.
Step One: The Cross
Alright, here is the first step for how to solve a Rubik’s cube. This step can be confusing to understand at first. To gain a clear picture, you may need to read through and practice it several times. As you may have noticed from playing with the cube, the centerpieces cannot be moved, only rotated. While this may seem frustrating, you can use it to your advantage. Build the cross around the white sticker center. Many online guides start with this as the base, so even if you get confused during the process, you can look up demonstrations with a similar model online.
The first step you need to accomplish is to get the white cross on top of the cube. Don’t worry about matching the centerpieces just yet. For now, focus on getting the white edges to the top layer. Next, flip the edges of the squares so that the white stickers are facing up and form a plus. Hold the cube so that the edges that need to be flipped are facing you. Then, use the algorithm: F, R, D, R, F2. This algorithm flips the edges so that the white parts face upwards. Do this for all of the edges until you have a white cross on top.
Next, you will need to orient your pieces. Look at the edges of the Rubik’s cube. Are none of the pieces matching? Perhaps two pieces are matching or maybe even all of them are. If your piece has all four edges matching the centers, you have solved the cross. If none of the edges are matching, perform a U move and then take another look at the cube. You want to have at least two edges matching. If none of the edges are matching, do another U move. Repeat this algorithm until you have either two or four edges that match the center.
Step 2: The White Corners
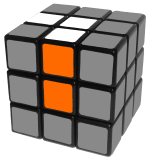
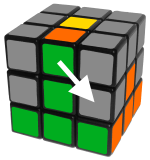
Now that you have completed the edges of the white face, all that you have left are the corners. This step is much simpler than the first, as it only requires one algorithm to complete. Take a look at the bottom layer of the puzzle. You want to locate the white, orange, and green corner. Statistically speaking, there is a fifty percent chance you will find this on the bottom of the cube. Follow these steps depending on where you locate the white, orange, and green corner.
Here is What You Should Do if You Find it on the Bottom Layer: If the green, white, and orange corner are on the bottom layer of the puzzle, use the required D move until the cube looks as pictured below. The required algorithm is as follows: R, D, R, D.
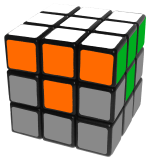
Here is What You Should Do if You Find it on the Top:
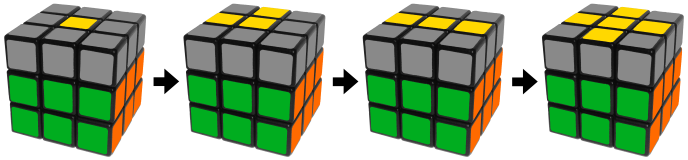
If the green, white, and orange corners are on the top of the Rubik’s cube, turn the cube to face you until the colors look like this picture below. Then, perform the R, D, R, D algorithm as many times as needed. Repeat this process until you completely solve the top layer. Start with the corners on the bottom, as this might save you a couple of unnecessary turns.
Middle Layer Edges:
Now, you are on to step three on how to solve a Rubik’s cube. Now that you are finished with all of the white pieces, you are ready to move on to flip your cube so it is all white on the bottom. Look for a piece on the top of the cube that is not yellow. Use a U move so that the color on the edge’s front face matches that of the center. It could go either left or right. Repeat this process for all four of the middle edges.
Left
Right
Step 4 Yellow Cross:
You are now two-thirds of the way through the puzzle. Every piece left to be solved has yellow on it somewhere. Now, we are going to solve the edges of the top layer in two steps. The first of the two steps involves orienting all of the yellow pieces so that they are all facing up. The second step involves moving these pieces around and thus solving the puzzle. Are you ready?
Ignore the corners at first. Look at the edges only. Are they oriented correctly? Here are the possible edge positions that you can have:
Are your edges currently solved in a cross pattern the way that we began this process? If so, you can go on and skip this step. If not, listen carefully. Besides the cross shape, it is possible to have a dot, L-shape, or a line as pictured above. To speed up the process, perform the following algorithm: F, U, R, U’ R’, F’.
Now, you should have an L shape, where the two yellow pieces that are showing are adjacent to one another. Complete the necessary number of U and U’ shapes to achieve this picture. Then, perform the following algorithm: F, R, U, R’, U’, F’. The four edges should now be oriented correctly.
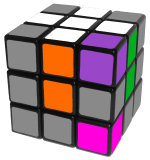
Step 5: Sune and Antisune
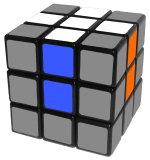
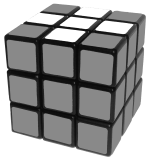
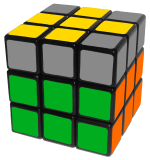
Don’t be off-put by the names. Sune and antisune are beloved by many puzzlers due to their simplicity. After you have oriented the edges, there are seven different corner positions available to you. Sune and antisune are two of these which we will discuss in a minute. This is what your Rubik’s cube should look like by step five.
How do you get to the spot where you only need to orient one more corner? Follow this algorithm: R, U, R’, U, R, U2, R’. When you get to this desired spot, there are two variations that can occur. They will look something like this:

This is sune and antisune:

The yellow front-facing corner can be in two positions. It can face either the front or the right. In the first image above, the yellow is facing the front. This means that you have a sune position. To solve sune, do the aforementioned algorithm one more time to solve the top layer The antisune position occurs when the right-facing corner appears as it does in the second picture illustrated above.
Step 6: Finish the Rubik’s Cube
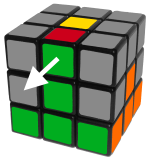
We are almost there! Hang on. Step six is the last part to solve the cube. While there are twenty-one cases for the top layer, we only need a few algorithms to figure them out and get it all sorted. First, we want to locate the headlights. The term ‘headlights’ refers to two corners that have the same color on one side. There are only two cases without headlights. For the case without headlights, perform the following algorithm from any angle: R’, F, R’, B2, R, F’, R’, B2, R2. At this point, you should have either finished the Rubik’s cube or a pair of headlights on every side of the puzzle.
After you performed the above algorithm in step six, there are five possible positions that your cube can be in now. Perform the necessary amount of U moves to ensure that each corner is in its right place. Do you have a completely solved bar? If so, perform the following algorithm and make sure that the bar is at the back: R, U’, R, U, R, U, R, U’, R’, U’, R2. If your cube is still unsolved, perform the above algorithm one more time, keeping the completed bar at the back of the cube. If you do not have a solved bar, you can perform this algorithm from any angle that you would like to. This will give you a solved bar and then you can do the algorithm one more time in order to complete the puzzle. Congratulations, you have completed the cube!
Magicians and a Sleight of Hand
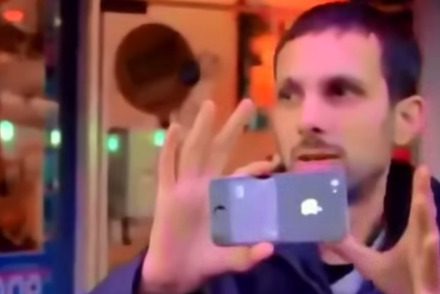
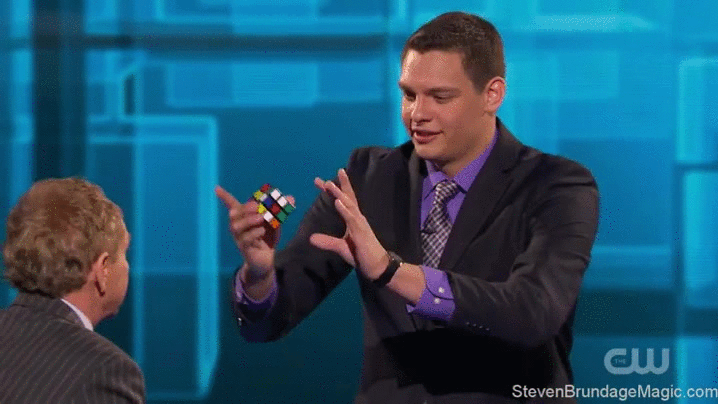
A few days ago, we were watching Penn and Teller’s hit TV show, Fool Us. On this show, magicians are given the challenge to trick two of the greatest minds in magic, Penn and Teller. A magician named Steven Brundage performed a magic trick using a Rubik’s Cube that blew away the audience and fooled two of the greatest minds in magic. You might be wondering ‘How is a Rubik’s Cube used in magic?’ The classic Rubik’s Cube magic trick is to solve it instantly… faster than humanly possible. The magician literally throws the toy (randomly mixed) into the air and by the time he catches it, it’s solved.
This is what it looks like:
Believe it or not, this is actually one of the simpler magic tricks to accomplish. The action involves the magician first taking a scrambled cube and showing it to the audience. Then, he attempts to solve it before throwing it up in the air. When he catches it, the Rubik’s cube is solved. So how is this trick done? There are actually a few ways to perform this magic trick.
How exactly did he do it? We’ve done our research and there are several common ways that a magician solves a Rubik’s cube instantly. We’ve broken them down in the sections below. Read through each of the possible methods and see if you can identify which one he used. We have to say that we are particularly impressed with Steven Brundage. Even after some heavy duty research, we’re still not exactly sure how he pulled it off. See if you can figure it out.
As you can see, it’s solved instantly.
Here’s the full performance:
The Classic Rubik’s Cube trick revealed
Here’s the tutorial on how the basic trick works.
How to Solve a Rubik’s Cube with Magic Instantly Explained:
Method 1:
The first one involves using a fake Rubik’s cube. When it is solved, one of the sides appears to be scrambled. This is not possible to do on a normal Rubik’s cube. By carrying out six simple moves on the cube, the cube appears to be completely scrambled. Using this cube, you can show the audience all sides. Then, hold the scrambled side facing the audience and undo the six moves you previously did, pretending to solve it. With a slight sleight of hand, the audience will believe they have seen all of the sides.
Method 2:
The next most common magic trick involves taking a mixed up Rubik’s cube, showing it to the audience, and then putting it inside of a paper bag. After the cube is taken out of the bag, it is solved. How can this be? Popular opinion is that this trick is a gimmick. In every performance with this trick, the paper bag is immediately thrown away without the audience being able to get a second look at it.
Method 3:
This is the most likely speculation for how Brundage could have pulled off the magic trick. In his live performance, he scrambles his own Rubik’s cube while speaking to the crowd, leaving the selected one untouched. Brundage then asks Teller to hold the cube in his hands. When he opens his hands, the cube matches the one that Brundage had scrambled. Brundage performed a set of moves on one cube and then repeats it on the scrambled cube while talking to the audience later on. While this sounds highly plausible, there is one thing wrong with this method. The theory would not work unless Brundage already knew which cube Teller would choose from the two that were scrambled. It is highly likely he had a plan for both cubes but we cannot know for sure.
Now that you know each of the magician’s methods used to solve a Rubik’s cube, let’s go back and watch Steven Brundage perform one more time. As you can see, it’s solved instantly. What an amazing sleight of hand! If you look at it over and over, you can see that he actually makes 4 moves. Did you catch it? Watch carefully. It’s extremely quick.
The Classic Rubik’s Cube trick is revealed:
Here’s the tutorial on how the basic trick works. As you can see, it’s a gimmick cube. That’s the classic way that the trick is done. However, Steven does not use a gimmick cube for his routine. He could perform that trick with any Rubik’s Cube according to his interviews. Steven states that there was no switching going on. That means: There weren’t extra trick cubes hiding behind the table that he was switching around. He states: “With all the being said… Yes, I am extremely good with Rubik’s Cubes.”
The classic Rubik’s Cube technique makes a lot of sense. He does say in his interview that if he were to use trick cubes, every one of his tricks would look identical as they did when he wasn’t. But even as he points out these subtle hints, it’s impossible to tell just how he performed this trick without a gimmick cube. Thanks to PerryThePly, a reader of Rebel Magic for sending in this update! He’s found something that gets us closer to understanding how this trick is done.
Thanks to PerryThePly, a reader of Rebel Magic for sending in this update!
He’s found something that gets us closer to understanding how this trick is done.
See also:
How To Hypnotize Someone (Powerful Techniques)