Stage Magic

Spotlight: The Magic of James Randi

Career, Stage Magic

Seventy years ago in the great white north of Canada, a young boy was struck by a car. This lad, James Randi, was placed in a full-body cast, beginning a long and grueling recovery. The doctors attending to him did not have high hopes he would ever walk again.

He spent thirteen months in the restrictive captivity of his cast, all the while reading and absorbing every book he could find on his favorite subject: magic and illusion.

His fascination with magic theatrics, combined with his sheer tenacity, not only put him on his feet again but would someday lead him all around the world as a professional magician. That is, all around the world hanging upside down from cranes, wrapped in chains and wearing a straightjacket. And he was just getting started.

The Amazing Randi

James Randi: psychic investigator photo
James Randi (front) appearing with guests (from left to right) Coral Polge, Stephen O’Brien, Nella Jones and Maureen Flynn on the Open Media tv series for ITV “James Randi: Psychic Investigator” (1991), by Open Media LTD, via Wikimedia Commons

James Randi has been a fixture in the magical community for three-quarters of a century, wowing audiences with his impossible escapes and eerie illusions.

Fans of escape acts should be well aware of his more famous feats. Tricks like escaping from an impenetrable prison cell or shedding a straight jacket while dangling in the air. Many considered him the heir apparent to the century’s first, and arguably greatest, escape illusionist, Harry Houdini.

James Randi even emulated the late Houdini later in life, retiring from the stage and moving towards active rational skepticism and the debunking of hucksters and frauds.

James Randi was born in Toronto, Canada in 1928. He was always a curious child; he found a love affair with magic and illusions through books and guides available at the library.

This love became a full-blown obsession after seeing the iconic conjurer and illusionist — Harry Blackstone Sr. — float a woman above the stage. He was smitten with the craft and never looked back. He dropped out of school at 17 and made his way to the rails, traveling with a carnival as their resident conjurer-in-training.

The carnival became his college of magic, picking up the tips of the craft from great escape artists, mentalists, and even the occasional sideshow performer or two. The total sum of this education lead him to the stage where he would introduce the world to the new and exciting conjurer supreme, the Amazing Randi!

It was on the traveling stage he honed his persona and perfected the techniques that would make him one of the greatest living illusionists and escape artists of the era.

Running Away to the Circus

How does a young Canadian go from learning magic in a full-body cast to performing in front of thousands all around the world? It starts with his perseverance to rebuild his body and dedication to the new craft in his heart, magic.

So what’s a boy to do when he’s ready to leave his broken world behind and chase down his dreams? Why, join the circus, of course.

James Randi the Carnival Magician

James Randi spent his formative years with a traveling carnival, all the while perfecting the escape routines that would take him around the world some day.

While he loved performing the exotic escapes and eye-popping illusions carried over from the days of vaudeville, he found an interest in more subtle performance art. It was there he found a keen ear for mentalism and an eye for macabre illusions.

It didn’t take long for his stage persona to outgrow the canvas of the carnival tent, so he packed up and went solo as The Amazing James Randi.

Early in his career, when he was still making his bones on stage, he was a night club performer. This stage in his career saw a mix of on-stage escapology paired with mind-behind mentalism.

James Randi got so good at performing mentalism and “mind-reading” gags, some people accused him of faking the trickery portion of the show. Faking to explain away very real and awesome psychic powers. This fuzzy line between performance art and supernatural phenomena would color his perception of the art of illusion, and later send him on a path of advocacy for logic and reason.

Great Escapes Get Greater

While he was developing the smaller, more intimate portions of his act, he relied on big escapes to draw in the wide-eyed crowds. During his first few decades performing, James Randi perfected a whole list of go-to escapes.

He would invite eager men to the stage to tie him, bind him, tape him, and even chain him to his chair, daring them to do their worst to ensure this small bearded fellow could escape to nowhere. Be it in the chains on a chair, in the straightjacket in a safe, or dangling high above Niagara Falls, the Amazing James Randi always found his way out.

It was during this time he built up a loyal audience throughout Canada and the United States, even making regular television appearances on talk shows and entertainment news programs. He became a performer of renown that would soon catch the eyes of other world-famous entertainers from the stage.

A Bigger World

As James Randi toured the world, other performers took notice of his skills. He befriended many other artists and performers that shared his love for stagecraft.

This attention and growing fame would put him in the orbit of some fellow amazing people, but it would also introduce him to a breed of performer he didn’t much care for and would later dedicate himself to exposing.

Rock-and-Roll Is Magical

While James Randi was touring the stages of North America, he was also working on several large-idea illusions, with most of them yielding a grotesque or sometimes gory effect. This penchant for horror-illusions drew the attention of another famous stage jockey of the time, Alice Cooper.

Cooper was himself a lifelong fan of magicians and illusionists, but instead of making his way into that field of performance he became a musician. Cooper was known for his elaborate stage shows that took on lives of their own.

In the early seventies he was readying a new album, which meant a tour was not far off. He needed something big, bold, and bloody to add to the show, and he knew just the man to help make it happen.

Enter Alice Cooper

Alice Cooper reached out to James Randi in 1972 and hired him to design an on-stage illusion that would shock his audience. Randi went above and beyond with a head-slicing guillotine illusion that seemed to defy the very rules of mortality.

Cooper was so impressed that he invited Randi on tour as his illusion guru. James Randi spent ’73 to ’74 on the Billion Dollar Babies tour as the faceless figure known only as “The Executioner.”

It was during this tour that Randi crossed paths with some other celebrities, namely Uri Geller and his rag-tag group of fake physics. While he was still a lover of illusion and tricks, he became disenfranchised with the frauds that used these same gags to con and deceive people out of their money.

He grew frustrated with people that claimed to be doing the miraculous while he knew that there was nothing more there than trickery and lies.

Following in Houdini’s Footsteps

The most famous escape artist before James Randi was the well known vaudeville stalwart, Harry Houdini. This illusionist and magician of renown had a fruitful and storied career performing illusions and great escapes all over the world.

Though performing was his lifeblood, Houdini pulled focus from performance to advocacy after the death of his mother. That tragedy would lead him into the parlors of mediums that tried to convince him they had his mother on the line.

It was this turn of events that would take him from the theater to the streets, where he took it upon himself to try to bring down the people he believed to be using illusion for nefarious and greedy reasons.

Houdini spent the latter end of his life exposing frauds and scam artists all over America. James Randi, his contemporary, would also fall into this same pattern of a performer turned advocate for the naïve and deceived masses.

The Rise of Dishonest-Liars

The seventies and eighties saw a significant rise in people in popular culture claiming to be psychics or other types of extrasensory sensitives. While some of these folks seem to perform impossible feats of the mind and body, James Randi saw something else: trickery.

The most prominent of these fakers was a self-described physic and clairvoyant, Uri Geller: the Spoon Bender. This illusionist was most famous for bending objects like spoons or house keys, all with the power of his mind.

Of course, James Randi knew better than that. It wasn’t so much that he felt these things were impossible (though highly improbable) but that he knew of a much more pedestrian explanation for their mind-bendy powers.

He became a regular on talk shows and in media as a skeptic of these “alternate illusionists”, often serving as an adjudicator of reality for the less magic-minded hosts. He would go on to expose many of these performers on shows like The Tonight Show with Johnny Carson.

James Randi Is on the Case

Slowly, he made his way form performing the tricks to exposing the tricksters. All with the spirit of keeping fantasy and magical illusion separate and apart.

Randi saw the blurring of the lines as a dishonest lie the people were being fed, as opposed to the honest lie of the magician. His biography, “An Honest Liar” was titled after his belief that magicians are liars; but that they are forthright about it, while the straight-up frauds would never admit to the use of illusions.

He turned his complete attention to this debunking in 1976 when, alongside Martin Gardner and Ray Hyman, he founded the Committee for Investigation of Claims of the Paranormal, or CSICOP. Their small band of skeptics, scientists, and illusionists all worked to bring down the dishonest liars and bring honor back to the field of stage magic and illusions.

The organization would move on to investigate thousands of people claiming magic powers and extrasensory abilities. These investigations later turned to advocacy and education, showing people how to think more critically about these sorts of paranormal claims.

Exposing Cheats, Liars, and Crooks

The growing movement of rational skepticism helped drive the message that there was a difference between what Randi did and what the frauds were doing. The later years of CSICOP would be defined by a string of exposures and debunking that once again catapulted James Randi onto the national stage.

Pop Off, Popoff

The most visible debunking of his career followed a visit to The Tonight Show, where he was a frequent guest. Johnny Carson was himself a skeptic and magician, so he was sympathetic to the mission that James Randi was on.

Carson would regularly have Randi on to talk about these subjects, even going as far as having him on the show in the same segment as someone claiming paranormal abilities.

Even Uri Geller stopped by the Tonight Show once to perform his tricks, but Randi got there before him, and, with minor preparation, he was able to get Geller to admit he was “feeling unwell” and could not perform his feats at that time.

As great as that takedown was, his most lasting debunking was that of world-famous televangelist and faith healer, Peter Popoff. A man that claimed to hear the divine in his ear, Popoff was known for calling out details about members of the congregation: things he should not know if not for the words of angels in his heart.

James Randi went on television and played the live audio he captured from one of these tent revivals, and to no one’s shock, the divine voice he was hearing was that of Popoff’s wife reading the prayer cards over a hidden ear monitor.

The tape would expose Popoff and introduce the world to the man that could break the psychics. He would go on to expose dozens of other frauds and tricksters over the years. He even hosted his own show overseas where he tested the paranormal in scientific and controlled conditions.

One Million Dollars

Even with this long and storied career up to this point, James Randi is most famous in contemporary circles for the James Randi Educational Foundation, or JREF, and the aptly named Million Dollar Challenge. It started as a ten-thousand-dollar cashiers check, offered to anyone that could prove — under proper scientific conditions and observations — that they have a paranormal or extrasensory ability.

This overt challenge was taken up by many, and all of them failed to meet the reasonable requirements set forth by Randi. They always had their excuses. However, relying on the steady hand of the scientific process and rational thinking, Randi could always claim the high ground against these failures.

The challenge got so much attention it would later turn into a million-dollar offer to anyone worthy of passing the laws of science and observation.

This challenge would open many doors in media and get a lot of attention to the foundation. The JREF turned that publicity and goodwill into massive educational efforts around the country, bringing science, skepticism, and even a love of magical illusions back into the public consciousness.

The JREF even had a decade’s worth of conferences in Las Vegas called The Amazing Meeting that tried to bring James Randi’s message to the general public.

The Honest Liar, James Randi

Now in his nineties, the diminutive Randi has slowed down just enough to enjoy smelling the roses. Though he no longer escapes from safes or rips off straightjackets, the spirit of magic and illusion still thrives in his writings, speeches, and educational materials.

The organizations he founded continue to move with his message of critical thinking. He continues to use magic and illusion as a way to expose the faults in our thinking, challenging people to look closely at what they are seeing and to question what they think they know.

Randi is now retired from performance magic, though he is still active in his critical thinking advocacy and still speaks to crowds regularly. He continues to tour the world and educate people on the beauty of magic and the power that comes with embracing critical thought.

There was a time when even professors at major universities would fall prey to his honest lies and illusions. Some of them went as far as accusing him of using actual magic and sorcery and lying about his abilities to cover up the truth.

Those accusations are the gold medal for any working magician, as they have truly blended the line between fantasy and reality, bringing the audience closer to our childlike innocence and wonder.

For James Randi, however, this is just more of an opportunity for him to remind the world that magicians are most certainly tricksters, charlatans, fraudsters, and liars — but they’re the most honest liars you will ever meet, and you will never meet a more honest liar than James Randi, and he’s proud of that.

How To Solve A Rubik’s Cube Instantly (As a Magic Trick)

Party Tricks, Penn & Teller, Performance, Revealed, Stage Magic, Tutorial

Solving a Rubik’s cube is no simple task. Solving a Rubik’s cube takes a good deal of patience and effort for most people. Have you ever tried to do it? According to FunTrivia.com, it takes an average of 48 to 100 tries to solve a Rubik’s cube. If done correctly, it can be solved in 17 turns. Knowing how to solve a rubik’s cube and do a few magic tricks can be a fun and impressive skill to show at a party. Some people have combined the two, for jaw-dropping entertainment.

History of the Rubik’s Cube

To completely understand how to solve a Rubik’s cube, you must know about its purpose and construction. In this section, I will provide you with a brief history of the Rubik’s cube. Believe it or not, it was never intended to be a toy. The Rubik’s cube was invented in 1974 by a Hungarian architect, Erno Rubik. What was its intended function? It was meant to serve as a three-dimensional model to explain geometric principles.

After designing this magic cube, he realized he could not solve it. As he moved the colored squares, he said: “It was a code I myself had invented! Yet, I could not read it.” Having nine colored squares on each side, the cube can be arranged in 43 quintillion ways (forty-three followed by eighteen zeros). It took him one month of rearranging the corners of each side to solve the puzzle. Since he was living in Hungary behind the Iron Curtain at that time, it took a few years for the puzzle to reach the market. In 1979, it was shown at the Nuremberg Toy Fair and spotted as a hit. In 1980 and 1981, it won Toy of the Year in the UK. By January 2009, it has sold more than 350 million copies, making it the greatest-selling toy of all time.

How to Solve a Rubik’s Cube

Have you experienced the frustration of holding a Rubik’s cube in your hands and being unable to solve it? Don’t worry too much about it. Whether you want to impress your friends with a fun party trick or close the chapter on that childhood curiosity, this guide will walk you through the simplest way to solve the puzzle.

An important thing to note when it comes to how to solve a Rubik’s cube is that it is not always easy. Sometimes, you may need to spend several hours attempting to solve it. However, if you would rather solve the cube in your hand than be able to solve any that are given to you, there are many informative articles and videos on the internet. The satisfaction of solving it is one of the best feelings. Are you interested?

Here is the first thing you need to know. There is an algorithm associated with how many turns are required to solve the cube. These turns can be represented by letters. The algorithms are combinations of moves that rotate pieces to get them where you want them. The puzzle has six sides (or faces) all of which can be turned individually – whether it be up or down, left or right, or front and back.

The common notation for these is U, D, L, R, F, and B. These faces can be turned in three different directions: U refers to turning the upper face clockwise, U’ is a counter-clockwise turn of the upper face, and U2 refers to half of a turning the upper face either direction. The apostrophe denotes a counterclockwise rotation for any of the notated movements. An advanced notion includes turns of the middle layers, double turns, and rotations. However, these won’t be needed in this guide. Now we will look at step one, the cross.

Step One: The Cross

Alright, here is the first step for how to solve a Rubik’s cube. This step can be confusing to understand at first. To gain a clear picture, you may need to read through and practice it several times. As you may have noticed from playing with the cube, the centerpieces cannot be moved, only rotated. While this may seem frustrating, you can use it to your advantage. Build the cross around the white sticker center. Many online guides start with this as the base, so even if you get confused during the process, you can look up demonstrations with a similar model online.

first step - how to solve a rubik's cube

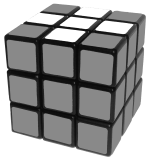
The first step you need to accomplish is to get the white cross on top of the cube. Don’t worry about matching the centerpieces just yet. For now, focus on getting the white edges to the top layer. Next, flip the edges of the squares so that the white stickers are facing up and form a plus. Hold the cube so that the edges that need to be flipped are facing you. Then, use the algorithm: F, R, D, R, F2. This algorithm flips the edges so that the white parts face upwards. Do this for all of the edges until you have a white cross on top.

white cross on top - how to solve a rubik's cube

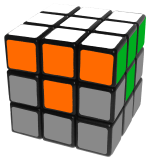
Next, you will need to orient your pieces. Look at the edges of the Rubik’s cube. Are none of the pieces matching? Perhaps two pieces are matching or maybe even all of them are. If your piece has all four edges matching the centers, you have solved the cross. If none of the edges are matching, perform a U move and then take another look at the cube. You want to have at least two edges matching. If none of the edges are matching, do another U move. Repeat this algorithm until you have either two or four edges that match the center.

umove - how to solve a rubik's cube

Step 2: The White Corners

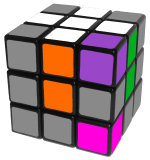
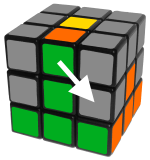
Now that you have completed the edges of the white face, all that you have left are the corners. This step is much simpler than the first, as it only requires one algorithm to complete. Take a look at the bottom layer of the puzzle. You want to locate the white, orange, and green corner. Statistically speaking, there is a fifty percent chance you will find this on the bottom of the cube. Follow these steps depending on where you locate the white, orange, and green corner.

Here is What You Should Do if You Find it on the Bottom Layer: If the green, white, and orange corner are on the bottom layer of the puzzle, use the required D move until the cube looks as pictured below. The required algorithm is as follows: R, D, R, D.

whitecorner - how to solve a rubik's cube

Here is What You Should Do if You Find it on the Top:

If the green, white, and orange corners are on the top of the Rubik’s cube, turn the cube to face you until the colors look like this picture below. Then, perform the R, D, R, D algorithm as many times as needed. Repeat this process until you completely solve the top layer. Start with the corners on the bottom, as this might save you a couple of unnecessary turns.

finditonthetop - how to solve a rubik's cube

Middle Layer Edges:

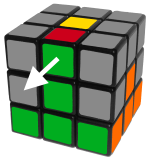
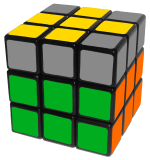
Now, you are on to step three on how to solve a Rubik’s cube. Now that you are finished with all of the white pieces, you are ready to move on to flip your cube so it is all white on the bottom. Look for a piece on the top of the cube that is not yellow. Use a U move so that the color on the edge’s front face matches that of the center. It could go either left or right. Repeat this process for all four of the middle edges.

middlelayeredgesleft - how to solve a rubik's cube

Left

middlelayeredgesright - how to solve a rubik's cube

Right

Step 4 Yellow Cross:

You are now two-thirds of the way through the puzzle. Every piece left to be solved has yellow on it somewhere. Now, we are going to solve the edges of the top layer in two steps. The first of the two steps involves orienting all of the yellow pieces so that they are all facing up. The second step involves moving these pieces around and thus solving the puzzle. Are you ready?

Ignore the corners at first. Look at the edges only. Are they oriented correctly? Here are the possible edge positions that you can have:

yellowcross - how to solve a rubik's cube

Are your edges currently solved in a cross pattern the way that we began this process? If so, you can go on and skip this step. If not, listen carefully. Besides the cross shape, it is possible to have a dot, L-shape, or a line as pictured above. To speed up the process, perform the following algorithm: F, U, R, U’ R’, F’.

Now, you should have an L shape, where the two yellow pieces that are showing are adjacent to one another. Complete the necessary number of U and U’ shapes to achieve this picture. Then, perform the following algorithm: F, R, U, R’, U’, F’. The four edges should now be oriented correctly.

Step 5: Sune and Antisune

Don’t be off-put by the names. Sune and antisune are beloved by many puzzlers due to their simplicity. After you have oriented the edges, there are seven different corner positions available to you. Sune and antisune are two of these which we will discuss in a minute. This is what your Rubik’s cube should look like by step five.

Sune and antisune - how to solve a rubik's cube

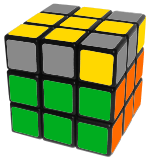
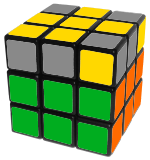
How do you get to the spot where you only need to orient one more corner? Follow this algorithm: R, U, R’, U, R, U2, R’. When you get to this desired spot, there are two variations that can occur. They will look something like this:

how to solve a rubik's cube

This is sune and antisune:

Sune and antisune algorithm2 - how to solve a rubik's cube

The yellow front-facing corner can be in two positions. It can face either the front or the right. In the first image above, the yellow is facing the front. This means that you have a sune position. To solve sune, do the aforementioned algorithm one more time to solve the top layer The antisune position occurs when the right-facing corner appears as it does in the second picture illustrated above.

Step 6: Finish the Rubik’s Cube

We are almost there! Hang on. Step six is the last part to solve the cube. While there are twenty-one cases for the top layer, we only need a few algorithms to figure them out and get it all sorted. First, we want to locate the headlights. The term ‘headlights’ refers to two corners that have the same color on one side. There are only two cases without headlights. For the case without headlights, perform the following algorithm from any angle: R’, F, R’, B2, R, F’, R’, B2, R2. At this point, you should have either finished the Rubik’s cube or a pair of headlights on every side of the puzzle.

After you performed the above algorithm in step six, there are five possible positions that your cube can be in now. Perform the necessary amount of U moves to ensure that each corner is in its right place. Do you have a completely solved bar? If so, perform the following algorithm and make sure that the bar is at the back: R, U’, R, U, R, U, R, U’, R’, U’, R2. If your cube is still unsolved, perform the above algorithm one more time, keeping the completed bar at the back of the cube. If you do not have a solved bar, you can perform this algorithm from any angle that you would like to. This will give you a solved bar and then you can do the algorithm one more time in order to complete the puzzle. Congratulations, you have completed the cube!

Magicians and a Sleight of Hand

A few days ago, we were watching Penn and Teller’s hit TV show, Fool Us. On this show, magicians are given the challenge to trick two of the greatest minds in magic, Penn and Teller. A magician named Steven Brundage performed a magic trick using a Rubik’s Cube that blew away the audience and fooled two of the greatest minds in magic. You might be wondering ‘How is a Rubik’s Cube used in magic?’ The classic Rubik’s Cube magic trick is to solve it instantly… faster than humanly possible. The magician literally throws the toy (randomly mixed) into the air and by the time he catches it, it’s solved.

This is what it looks like:

Believe it or not, this is actually one of the simpler magic tricks to accomplish. The action involves the magician first taking a scrambled cube and showing it to the audience. Then, he attempts to solve it before throwing it up in the air. When he catches it, the Rubik’s cube is solved. So how is this trick done? There are actually a few ways to perform this magic trick.

How exactly did he do it? We’ve done our research and there are several common ways that a magician solves a Rubik’s cube instantly. We’ve broken them down in the sections below. Read through each of the possible methods and see if you can identify which one he used. We have to say that we are particularly impressed with Steven Brundage. Even after some heavy duty research, we’re still not exactly sure how he pulled it off. See if you can figure it out.

classic rubiks cube magic trick

As you can see, it’s solved instantly.

Here’s the full performance:

The Classic Rubik’s Cube trick revealed

Here’s the tutorial on how the basic trick works.

How to Solve a Rubik’s Cube with Magic Instantly Explained:

Method 1:

The first one involves using a fake Rubik’s cube. When it is solved, one of the sides appears to be scrambled. This is not possible to do on a normal Rubik’s cube. By carrying out six simple moves on the cube, the cube appears to be completely scrambled. Using this cube, you can show the audience all sides. Then, hold the scrambled side facing the audience and undo the six moves you previously did, pretending to solve it. With a slight sleight of hand, the audience will believe they have seen all of the sides.

Method 2:

The next most common magic trick involves taking a mixed up Rubik’s cube, showing it to the audience, and then putting it inside of a paper bag. After the cube is taken out of the bag, it is solved. How can this be? Popular opinion is that this trick is a gimmick. In every performance with this trick, the paper bag is immediately thrown away without the audience being able to get a second look at it.

Method 3:

This is the most likely speculation for how Brundage could have pulled off the magic trick. In his live performance, he scrambles his own Rubik’s cube while speaking to the crowd, leaving the selected one untouched. Brundage then asks Teller to hold the cube in his hands. When he opens his hands, the cube matches the one that Brundage had scrambled. Brundage performed a set of moves on one cube and then repeats it on the scrambled cube while talking to the audience later on. While this sounds highly plausible, there is one thing wrong with this method. The theory would not work unless Brundage already knew which cube Teller would choose from the two that were scrambled. It is highly likely he had a plan for both cubes but we cannot know for sure.

Now that you know each of the magician’s methods used to solve a Rubik’s cube, let’s go back and watch Steven Brundage perform one more time. As you can see, it’s solved instantly. What an amazing sleight of hand! If you look at it over and over, you can see that he actually makes 4 moves. Did you catch it? Watch carefully. It’s extremely quick.

The Classic Rubik’s Cube trick is revealed:

Here’s the tutorial on how the basic trick works. As you can see, it’s a gimmick cube. That’s the classic way that the trick is done. However, Steven does not use a gimmick cube for his routine. He could perform that trick with any Rubik’s Cube according to his interviews. Steven states that there was no switching going on. That means: There weren’t extra trick cubes hiding behind the table that he was switching around. He states: “With all the being said… Yes, I am extremely good with Rubik’s Cubes.”

The classic Rubik’s Cube technique makes a lot of sense. He does say in his interview that if he were to use trick cubes, every one of his tricks would look identical as they did when he wasn’t. But even as he points out these subtle hints, it’s impossible to tell just how he performed this trick without a gimmick cube. Thanks to PerryThePly, a reader of Rebel Magic for sending in this update! He’s found something that gets us closer to understanding how this trick is done.

Thanks to PerryThePly, a reader of Rebel Magic for sending in this update!

He’s found something that gets us closer to understanding how this trick is done.

See also:

How To Hypnotize Someone (Powerful Techniques)

Easy Magic Tricks You Can Learn Today

How to Do The Double Lift

How To (correctly) Guess Someone’s Age EVERY TIME

Party Tricks, Revealed, Stage Magic, Tutorial

Everyone has tried to guess someone’s age before. But if you’re a magician and you’re in a show, guessing someone’s age incorrectly will discredit your skills in front of your audience. If, however, you memorize this math-based trick, you will actually be able to tell anyone their age. All you need for this age guesser trick is a calculator.

To help people see your calculator, try to get one with big buttons and a big screen. That’s really for their benefit, not yours! You might even decide to show the calculator through a projector screen if you’re performing this in front of a large crowd.

How It Works: Methods to Guess Someone’s Age Correctly

There are many ways you can perform the ‘guess her age’ challenge. The secret is that you are not guessing at all. In this article, we will go over a few methods, including the famous math-based trick. To the participant, it appears that you are performing a magic trick. But all you need to do is memorize these instructions and practice. The math is proven to work every time. Make sure to give clear instructions so you can get their birth month and year (without them realizing, of course).

1. Guess Someone’s Age Using a Selected Number

The first way to perform the age guess magic trick is through deduction with a selected number. You can perform this trick with a friend or stranger. Ask the participant to choose a number between one and ten. Once they have a number in mind, have them announce it. Let’s say they chose the number 7. Pause to tell them that you’re sorry, and you didn’t realize the math might be too hard for them, so you’ll get them a calculator.

Multiply the number they have chosen by two (e.g. 7 x 2 = 14). You can choose to do this math by hand or have a friend use a calculator to do the rest of the trick. Tell them that they must push the equals button on the calculator for every instruction you give.

Second, walk them through selecting their number and multiplying it by two again on the calculator. This is a great opportunity to build some humor into the act. Continue this humor by asking them to get ready for some big math before telling them to add 5 to their current value (14 + 5 = 19).

Then, move into the big math. Ask them to multiply the current number by 50 (19 x 50 = 950). Ask the participant if they have already celebrated their birthday this year. Did their birthday pass already? If so, you will add 1,769 to the prior result (e.g. 950 + 1,769 = 2,719). If not, then add 1,768 to the prior result (e.g. 950 + 1,768 = 2,718).

This number changes yearly, so here is a chart to reference:

2019: +1768 or +1769

2020: +1769 or +1770

2021: +1770 or +1771

2022: +1771 or +1772

After they add this number in, tell them not to say it out loud, but to subtract their birth year. Then, say “That’s it!” They’ll be confused because they will have a three-digit number far too large to be their age. You can act confused as well, and take the calculator from them.

Have them subtract the year they were born from these numbers without you looking (e.g. 2,718 – 1989 = 729). Look at the final answer. The first digit in place will be the original chosen number from the participant. The last two numbers will be the person’s age. So, the participant here would be 29 years old.

Put on a show sharing this information with the audience, and you’ve successfully guessed both their age and the number they chose at the start of the trick without hurting any feelings. At the end of it, people will think you are a mind reader. All it took was some simple math!

2. Guess Someone’s Age Using a Calculator

The second way to perform the age guessing game is by using a calculator. While the participant may need a calculator to perform the first act, this method is quite different. Start by asking the participant to multiply the first digit of their age by five. Let’s say that they are twenty years old (e.g. 2 x 5 = 10). Now, tell them to add three (e.g. 10 + 3 = 13). Have them double the resulting number (e.g. 13 x 2 = 26).

Now, have them add the second digit of their age to the resulting number (e.g. 26 + 0 = 26). Tell them to subtract six. This will be their current age (e.g. 26 – 6 = 20).

3. Guess Someone’s Birth Month and Date with a Calculator

Did you know that you can also use a calculator to deduce someone’s date and month of birth? This is a fun way to take the let’s ‘guess your age’ magic trick up a notch.

Start by entering the number seven in the calculator. Then, have the participant multiply the number seven by their birth month. Let’s say their birth month is May (e.g. 7 x 5 = 35). Remember not to look at the calculator. You don’t want the person (or audience) to think that you are cheating.

Now, subtract one from that number (e.g. 35 – 1 = 34). Multiply the resulting number by thirteen (e.g. 34 x 13 = 442). Have them add the day of their birth (e.g. 442 + 28 = 470) and then add three (470 + 3 = 437). Multiply the new number by eleven (437 x 11 = 5,203). Subtract the month of their birth (5,203 – 5 = 5,198).

Now, subtract the day of their birth (5,198 – 28 = 5,170) and divide by ten (5,170 / 10 = 517). Add eleven (517 + 11 = 528). Divide by 100 (528b / 100 = 5.28). The first digit before the decimal is their birth month (5 = May). The two digits after the decimal point is their birth day (28 = birth day).

Have you Heard About the Artificial Intelligence Age Guesser?

Nowadays, the sophistication of technology is moving at a surprisingly rapid rate. You may have heard that a few years ago, Amazon and Microsoft both released an artificial intelligence picture age guesser. You choose to either upload a picture of yourself or take a selfie. The device scans your photo and through face detection, assesses your age. We wondered how accurate the age guesser is. So naturally, we had to try it out for ourselves.

After reading multiple reviews and experimenting with the software ourselves, we did not find it to be accurate. The software will make different estimates for your age based upon nuances like your facial expression and the angle from which the photo was taken. For magicians, we would stick with the math-based age guesser tricks to accurately gauge someone’s age. Don’t try to take a shortcut and use image software first.

Brush Up on Your Math Skills and Memorize these Formulas

We get that math is not everyone’s strong suit. That is why we are so excited to share these formulas. All you need to do is practice and use a standard calculator to perform this age guessing trick accurately. Make sure to memorize the formulas before you try it out on a stranger or perform in front of a small audience. With repetition and dedication, you are on your way to becoming a good magician.

Watch it in action!

Watch the same magic trick you learned above, and see how it works on you!

Spotlight: The Magic of Lennart Green

Card Tricks, Stage Magic

When it comes to magic, you need a combination of professionalism and charm to win over your audience. This involves never performing the same trick twice and of course, never revealing the secret to your trick like how Lennart Green does it.

But what about fellow magicians?

Usually, if another magician or illusionist is watching a performance, they’ll know exactly how the magician is working his/her tricks.

However, when fellow magicians watch Lennart Green, it’s an entirely different story.

Lennart Green: Pros & Cons


PROS

  • Full of insights on his famous tricks

  • Detailed explanation how he setup his performances

  • Reveals the secrets behind professional and award-winning acts

CONS

  • Expensive

Card Trick Abilities

Lennart Green is a Swedish magician, highly known around the magician community and fellow professionals for his card trick abilities.

Throughout the years, Green has been a doctor, a nurse, an assistant gymnastic professor, and violin crafter. However, out of all his many hats, he wears his magician hat the best.

Lennart Green is widely known for his more disorderly magic performances which are both unique and entertaining.

Many claims that his skills and showmanship are unlike any other magician’s, making his shows awe-inspiring for even the most talented magic professionals.

We will discuss who Lennart Green is, his tricks and reviews of the products he offers to help you become a skilled magician yourself.

Lennart Green Background and Famous Moments

It was a show in 1988 that helped Lennart Green rise to the top of magician kingdom.

This was when he was performing magic in close-up style for the judges at the FISM convention.

This event, for all of you who aren’t familiar with magician competitions, is the cream of the crop and takes place every three years.

Lennart amazed the audience with his close-up card trick but then was disqualified under suspicion of using stooges in this act.

This is because the trick Lennart performed was deemed impossible, so the judges assumed he was cheating.

What was the trick?

lennart green: cards facing backwards

Lennart called a volunteer up on stage and asked them to shuffle his deck of cards, however many times they wanted.

The assistant was asked to name a card, and amazingly, Lennart took the card from the deck.

The judges couldn’t believe it, so they immediately disqualified him.

Lennart continued performing as an amateur magician for years, despite his protesting and pleading with the judges.

Three years later, at the same convention, Green entered the close-up magic competition with the same trick. The only difference was this time he invited the judges and their assistants on stage to perform his unbelievable trick.

So, just as before, he asked his assistants (now judges) to shuffle his pack of cards. Again, the trick worked magically, apologies were made, and Green was awarded first place. Enabling him to become a professional magician at last.

Ever since this convention, Lennart Green has become very well known for his lectures and magic tutorials among magicians and fans. These talks and showcases have become so popular and are so well done; he was invited to record one on TED talks.

You can check out the talk, “Close-Up Card Magic with a Twist,” here.​​​

Products and Tricks

Since Lennart Green’s feat at the FISM convention competition, he has created a range of different tricks and products for his audience, fans, and fellow magicians.

We will outline some of the best products and tricks Lennart Green offers, followed by reviews of some of our favorites.

“Stolen Cards” DVD and Deck

With this trick, the skilled magician Lennart Green starts with the basic trick of the Gemini Twins with a normal deck of cards.

Green takes this trick to a whole new level by adding two revelations. A plot and a deck of unique, custom-made cards.

This is a self-working trick which means there’s no sleight of hand tricks needed. The cards that he includes and of course, the presentation, provide incredible performance.

There are some other effects that are similar to Stolen Cards, while not the same.

Kaleidoscope Cards

One card trick called the "Kaleidoscope Cards" by Daryl is very similar and also includes a custom-made deck.

This assemblage of a custom card deck and magical DVD performance is hard to beat.

Lennart Green is a unique magician with originality that comes through his comical and amazing performances. 

He was well-loved and desired all over the world. An example of this is his appearance on NBC’s World’s Greatest Magic. Not only was he chosen to appear on this great show, but the outcome was amazing —everyone loved him.

Through this DVD set, Lennart uses his unique skills to teach aspiring magicians and his fans how to become a magical being.

lennart green: cards focused on close up

Classic Green Volume 1 of 6-Part DVD Set

This volume includes the F.I.S.M act which is the act that made Lennart Green famous around the world.

Included in this act are disappearing glasses, the laser deal, separation of colors, appearing glass of liquid, and a full deck separation straight from a shuffled deck.

You’ll also find in this act, Lennart’s blindfolded ace through to king production.

While this part is shown as performance only, you’ll be able to learn techniques and parts of this routine throughout the three-part set.

This act also includes a large number of sleights, providing one of the greatest assemblages of unique card material available.

Classic Green Volume 2 of 6-Part DVD Set

Lennart is truly one of a kind, and this fact comes out in Classic Green Volume 2.

Lennart can do tricks with a deck of cards you wouldn’t believe. Because of his incredible card magic and his wonderful sense of humor on addictive performances, the world has sought after him.

A World Champion of FISM and featured magician on NBC’s World’s Greatest Magic. Lennart is a world-class entertainer and magician with more than just a few unique tricks up his sleeve.

In volume 2, you’ll get background information and insight on his tricks, The Poker Deal, Deceptive Perception, The Temple of Shiva, The One-Two Separation, The Swedes Deal, Fale Angle Riffle Shuffle and more.

Classic Green Volume 3 of a 6-Part DVD Set

Volume three of the six-volume set of DVDs provides more wild magic that makes Lennart Green a world-class entertainer and magician.

You’ll be able to gain insight into his most famous routines and techniques created to blow up the minds of his audience.

In Volume #3, you’ll find the background information and insight into his tricks, Fractal Harmony, Impromptu Royal Flush, 2nd Birthday Gift, One in Fifty-Two Bet. These and many more amazing tricks to learn from and practice into your magic routines.

Classic Green Volume 4 of a 6-Part DVD Set

One of the highlights in a Lennart Green performance is when he consistently separates the aces into a red or black order and a new deck order.

In these DVDs, he displays the many methods of using and accomplishing this trick.

Along with this, you will also learn about his love of false shuffles and cuts while learning all the techniques needed to excel at these tricks.

In this specific volume, he outlines Introduction to False Shuffles, Mirror Shuffles, MCavakacade of False Shuffles and Mirror Cross Shuffle.

Classic Green Volume 5 and 6 of a 6-Part DVD Set

To finish it off, Lennart Green has two more volumes to this 6-part DVD set.

In these parts, he uncovers more of his incredible tricks, how to master them and the techniques behind their wonder.

In these two DVDs, you’ll find some of his popular tricks such as:

  • The Rope and Nute, Crab Cut
  • The Maurai Move
  • Max Milton
  • The Drop Pass
  • Laser Deal
  • Flexible Deck
  • Lateral Vanishing Deck
  • Drop Cull Separation and many more

You can purchase this box set here at My Magic on Amazon

Lennart Green’s Green Lite

Lennart does unimaginable things with cards. Although he is well known for his wild looking card magic; he is also passionate in mathematical principles. And he incorporates them in his card routines.

On this DVD, you’ll find some of this magic that’s self-working, easy and well-explained.

Some of the routines explained include:

  • Fractured Logic
  • Rain Man
  • 4 Aces Squared
  • $26,000 Bet
  • Stolen Cards

Masterfile: Four Set DVD

This set was produced in Portugal by Luis de Matos and includes a four-disc DVD set that includes all of Lennart Green’s creative catalog.

In this set, Lennart reveals the secrets behind professional and award-winning acts, including ten routines, 35 sleights, controls, and flourishes.

Along with this valuable information and material, it also includes two hours worth of interviews by Luis de Matos as he interviews Lennart Green about his work, magic, and life.

These interviews provide insight into one of the most respected and admired magical performers of all time. Through this, Lennart talks about his early influences, his love of magic, music, and puzzles.

This set is subtitles into six different languages: French, English, Portuguese, Spanish, and Japanese.

The specific discs include:

Disc 1:

a performance at the Baroque Library at the University of Coimbra which is Green’s professional act that has taken him all over the world. It fully explains every trick, every tint tip and line of the pattern.

You can enjoy the full performance as well as become amazed by the explanations behind the tricks.

Disc 2:

Car separations, special moves, cuts, and shuffles. In this disk, Green takes shuffled cards and amazingly restores them to the regular order.

He tells us all about his techniques, stunning products, secret false shuffles, and everything you need to know to become a magician like him.

He uses these techniques in the thousands of his performances which have given Lennart Green the title of, “The Master of Chaos.”

Disc 3:

Lennart's favorite close-up routines: Stonehenge, The Terrorist, Two Dragons, Something Happened and many more.

These are all featured and explained which will have magicians loving his poker routines and tricks.

Disc 4:

Poker Routines, Three Shell Game, Coins Through the Table, Origami are all included in these routines that will have your crowd roaring.

Green performs dozens of tricks and sleights and moves in this DVD set, one of the finest you can find.

Lennart Green is world famous for his unique and comical performing style and brilliant tricks and thinking behind his performances.

In these DVD sets, you’ll have an inside look at Lennart Green. What makes him world famous and how he sets up his tricks to amaze his audiences over and over.

What People Say About Lennart Green: Performance and Product Review

lennart green: blur design deck fingers

People love Lennart’s performances due to his comedic and unique way on stage.

As mentioned before, Lennart Green can trick anyone in his audience, whether he’s performing for judges or professional magicians.

He is original, smart and comedic which is why millions of admirers continue to look to him for inspiration and entertainment. 

Customer Rating

Price

Our Rating

$$$

Lennart Green Product Review

Out of all the products Lennart has produced, Masterfile is by far our favorite, as it is others.

You can buy the product on Amazon, or you can purchase it on Theory 11.

Out of 68 ratings on Theory 11, this DVD set has received an average rating of 4 ¼ stars which is pretty impressive.

On Amazon, this DVD set has received five stars out of two reviews.

Overall, we think Lennart Green has deserved his fame and admiration. He is a fantastic magician with a flair for amazing people with his skills, vibrancy, humor, and amazing stage performance.

His true colors come through when performing, showing true passion for what he does. We highly recommend learning from him as it will mean learning from one of the world’s absolute best card magicians of our time.

How to Make and Use the Invisible Deck

Card Tricks, Stage Magic

The invisible deck is a trick deck of cards with nearly endless possibilities. It is also known as an imaginary deck, and to magicians, it is referred to as a utility deck. It’s a great deck of cards to have in your repertoire as a magician because you can perform many tricks. You can convince strangers that you are a powerful magician. All it takes is a matter of seconds to prove your powers.

The invisible deck is not a sleight of hand trick. Its effects are not achieved because of the way you deal the cards or hold the cards. Nothing is up to your sleeve. The secret lies entirely in the deck itself and the way you arrange it.

invisible deck
How to Perform with an Invisible Deck

The classic way of performing the trick is that a magician asks someone from the audience to imagine a deck of cards. The audience member mimes shuffling this imaginary deck of cards, and then removes a card from the deck. Then pretends to look at the imaginary card, memorizes, then to place it back faces down with the rest of the cards.

At this point, the magician brings out the real deck of cards. The magician asks the volunteer what card he or she picked. Then the magician fans out the deck of cards and explains that they are all face up except for the card that the volunteer picked from the imaginary.

For example, the volunteer reveals that he/she picked the 5 of diamonds, the magician would fan out the card until he hit upon one face-down card. He removes the card and flips it over, revealing the 5 of diamonds.

Tailor Your Routine to FIt the Audience and the Setting

Variations of this trick involve the illusion of mind reading. Rather than miming picking a card from a deck, audience members are asked to simply picture a card in their heads. When the magician produces the exact card that the audience member picked, the magician seems to read their minds.

Once you know how this trick works, you can apply its principles to a broader range of tricks and truly appear to be able to read minds at will. You can always lengthen or shorten the trick depending on the effect that you want to achieve.

invisible deck
The Invisible Deck For Street Magicians

If you were doing a bit of street magic, you might want to do the trick quickly. However, if you were performing on stage, you might want to draw it out more. You might ask the volunteers to keep narrowing down their choices to add to the suspense. First, ask them to pick either even or odd numbers. From there, make them choose spades or diamonds. The more choices you make the volunteer make, the more the anticipation builds.

For parties or street magic the trick works best in a quick flash. You just walk up to a person and ask them to name a card. They say the 2 of hearts, and you pull out your box of cards. You remove the deck from the package and let the person observe that all the cards are face up. All the cards are face up except one card. You pull out the face-down card, flip it over to reveal the 2 of hearts and then put the deck back in the package and walk away.

In this scenario, doing the trick once and quickly, it helps to leave your audience bewildered. You just swooped in, dropped a magical bomb, and then in a flash; you’re gone. How on Earth did you do that? They might beg to do it again to try to figure it out, but one taste is all they get.

How the Invisible Card Trick Works

So how does it work? How can a magician, without sleight of hand, get the exact card that someone said out loud from a pack of cards? Not to mention it hasn’t gone out from the pack yet. It sounds like it must be complicated, but again, the unique construction of the deck does all the work.

You can purchase a pack of cards for the invisible card trick, or you can make your own. Either method employs the rough and smooth technique. This is used in many magic tricks. When applied to cards it means that one side of the deck is rough, and one side is smooth. Since the texture is different, the cards can stick together or pull apart, depending on the touch of the dealer.

In this trick, the cards are rough on their backside, so they stick together. This means that both sides of the deck when fanned out, are face up. On one side of the hand, even number and on the other side are the odd numbers.

Getting the Cards Arranged Properly

The aces are worth 1, the Jacks are worth 11, the queens are 12, and the kings are 13. Each pair of cards is arranged so that the pair adds up to the number 13. The kings are paired together. Red kings are odd, and black kings are even. Hearts are always paired with spades, and diamonds are always paired with clubs.

This system of arranging the cards allows you to quickly locate the correct card and slide it face down among the other face-up cards. It’s a system that requires practice to get it right. Here are a few examples to help get the point across:

Begin The Invisible Deck Trick

Okay, so you go up to someone at a party and ask them to name a card. They name the 8 of clubs. You take your deck out of the box so that the odd numbered cards are facing up. You know that eight plus 5 equals 13 and that diamonds are paired with clubs. That means that as you fan the deck out, you are looking for the 5 of diamonds.

You are looking for the 5 of diamonds because you know that it is paired with the 8 of clubs. When you find the 5 of diamonds, you push the 8 of clubs out from behind it. It will appear face down in the deck. When you flip it over, voila. It’s kind of a mic drop moment.

If someone were to say the ace of spades, what would you do? Aces are worth 1, so need the card that is worth 12. That’s a queen. Spades are paired with hearts, so you need to find the queen of hearts. Once you’ve got the queen of hearts, you just need to gingerly slide the ace of spades out from behind it.

invisible deck
Tips to Perform it with Ease

There are two things to remember when you perform this trick after you have mastered the system of arranging the cards.

The first thing is how you take the cards out of the box. If someone asks for an odd numbered card, you remove the cards from the box where the even numbers are facing up. If someone asks for an even card, then you remove them with the odd numbers facing up.

The second thing is how hard, or light your touch needs to be on the cards. When you fan them out to find the correct card your touch needs to be light. If you are too heavy-handed, the cards will begin to separate, and the trick is a bust.

When you get the right card, you have to have enough quick force with your fingers to slide the rough-sided card free. If the cards stick together, you’ve botched the trick.

Where to Get the Invisible Deck

You can purchase an invisible deck from lots of online sources, but you can also make your own. The advantage of making your own is that you can turn any deck of cards into an invisible deck.

All you need is a deck of cards and a can of matte finish clear spray paint. Lay the cards face down on a surface that is out in the open to spray paint on. Spray the backs of all the cards and let them dry thoroughly. Then arrange the cards according to the above system.

The thin layer of spray paint makes the backside of the cards just tacky and rough enough so that they stick together. Remember, you’re not trying to glue the cards together, you want enough resistance to keep them from fanning out when you display them to the audience.

Appear Truly Magical to Your Audience

With the right deck and practice, you’ll be able to perform the trick that will leave people mesmerized and dumbfounded. They’ll know that it was a trick, but they will ponder it over with the only conclusion that you are truly magical and a mind-reading expert. That’s a pretty nice return on a pack of cards and a little bit of memorization.